
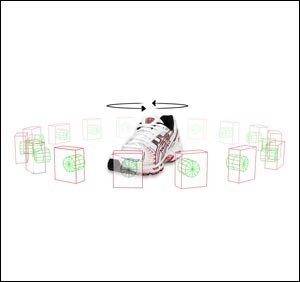
How do 360 Images work?
Introduction to the technology for 360 images
360 Images always start with a product of some sort. We then take images of the product in a rotation. After the images are edited, we combine the images into a rotation. The rotation is referred to as a 360 image. Once the 360 image is complete, we either add a viewer or the customer loads the images into their viewer.
Our clients are always working to find a better way to showcase their products online. We use 360 images or 360 product photography to help them on their path. To showcase the 360 views on their pages, we add an html5 player to their page or use a plugin that has been created for their platform. We help our customers, but we are not in the business of creating 360 viewers anymore. We can help with a few lines of code to show your 360s with an iFrame include.


The process of creating 360 images
Now when it comes to creating 360 photography, we can talk for days about how we do this. Just take a look at our 360 Product Photography Examples to see examples of what we have done in the past. At the same time, we do not feel that you are wanting to get in the weeds on how it is done. We hear many times a week in the studio that the client does not want to know how the sausage is made. So here is the short take of what we do for our 360 product photography service.
First, the product is mounted or placed on a turntable. The turntables can be controlled to move the object in the desired number of degrees. Once the item is moved, the camera takes a picture. All of this is done in a controlled environment with consistent lighting and color. Depending on how many images we want in the rotation, the camera will click away for a few minutes to as much as a half-hour. With the photos taken, we move into all the post-processing of the 360. At this point we also work to make sure that your new rotation fits the 360 Product Photography Specifications for your retails sites.
Introduction to the post-processing of 360 views
This is where we work on the computer to make your images stand out. Always keep in mind that everything that we do, must be done to all the images in the 360. We work to remove the background to a solid white color as well as cleaning up the product itself. This is also the step where we make your products’ colors pop. We will get deeper into the process below.
Introduction to 360 Product Photography hosting.
Once the product is rigged, photographed, and post edited, we output the images in a few different formats so that it is much easier and faster for you to add the great 360s to your site. One of the standard outputs that we create is an HTML5 output. This is a collection of files that create a full product display that can be viewed on its own or included in a page once the files are uploaded to a web server. Think of it this way, we send you the files to upload to your site and you can showcase your product if you keep your hosting up to date. No monthly charges, and no additional costs. We are not in the hosting business, although from time to time, we store a 360 view up on our servers for clients that are having difficulties uploading their files through services such as Wix. Find out more about 360 product photography hosting.
More on the display technology behind viewers for 360 images.
Now you might want to have your own 360 viewer on your site. That is never a problem, we also export sequential images of your 360. These are each frame from of your rotation in separate files that you can upload into your own viewer. So where do we start on the options for viewers? How about a quick list of some of those that are currently available!
- https://www.webrotate360.com
Webrotate360 sells a viewer that you install on your site with plugins for WordPress, WooCommerce, Magento, Prestashop, BigCommerce, Shopify, OpenCart, Joomla, Squarespace, Weebly and Wix. You can view these options here. https://www.webrotate360.com/products/cms-and-e-commerce-plugins.aspx - https://sirv.com/features/360-product-viewer/
Sirv sells a viewer that you can install on your site with plugins for WordPress, WooCommerce, Magento, Prestashop, BigCommerce, Shopify, OpenCart, Joomla, Squarespace, Weebly and Wix. You can view these options here. https://sirv.com/integration/ - https://www.imajize.com
Imajize’s viewer is a hosted option and offers options for adding their viewer to the following sites Shopify, WooCommerce, WordPress, Ecwid, Magento, Squarespace, eBay, Amazon and BigCommerce. You can view these options here. https://www.imajize.com/360-viewer/integrations/ - https://www.magictoolbox.com/magic360
This is a self-hosted option that advertises easy inclusion on the following sites. Magento, WooCommerce, PrestaShop, Shopify, OpenCart, cs.cart, xCart, zen cart, WordPress, WP eCommerce, Jigoshop, The CartPress, Joomla, VirtueMart, HikaShop, redShop, Oxid, Cudecart, Ecommerce Templates as well as LiteCommerce. More information is available here. https://www.magictoolbox.com/magic360/integration/ - https://www.gnome.com
Garden Gnomes Object2vr is our preferred option for 360 product creations as well as our go to 360 viewers.
Ok, we will stop at the top 5 viewers, each of these has its own pros and cons. You might want to look through all these viewers before you pick your final choice.
This is just a short list of the viewers, how about the great things that can be done within the viewer.
How about Product animation, callouts, hotspots, videos, contact links, transparent backgrounds, sound, and many other things. If you dream it, we will find a way to make it work, if possible.
Lights, Camera, Action… Creating 360 Product Photography.
Once the product has be delivered to our studios, we start taking photos. We are a photo studio after all. We have built ours over the last 20 years to work the way we work. The process of photography at this point is simple, but never easy.
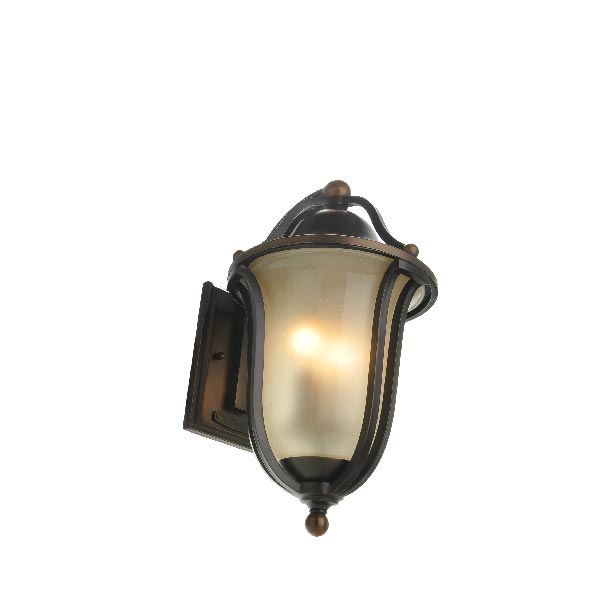
 The product is placed on the turntable, and the item is photographed. But getting it to this point has been a long walk. We have built our own turntables, that way they do what we want. These tables have tabletop options that are flat, have mounting holes, and have locations for armatures for holding your products. An example that comes to mind is a lighting product shoot we did a while back that we needed to build false walls to hold the wall sconces so that they can be photographed.
Once the product is setting on the turntable, we move to product photography lighting. Now here at PhotoSpherix, most of our studios are shot with strobe lighting. This is what we have always used, and it is what we like best, but it is not always the answer. Today, we use led lighting on some of our smaller rigs. Flags, diffuser, soft-boxes and reflectors all get used to help shine the light on the product.
Now we take the pictures. Well, we really tell the turntable to take the photos. Other times, we must manually advance the process so that we can animate the product while we are taking the photos.
While the photos are being generated, they are also moved to the editing suite so that we can start the post processing process.
More on post-processing of product photography images.
 On we have the photos in the editing computer, we create a 360 view to see how the rotation looks. Now, we know that this is just a rough rotation. We know we have editing to do, but by starting with a viewable rotation, we can figure out where to start. The next step is to pare down the image to the largest image that we need. We shoot our raw images much larger than what the finished product is. Wider, taller, and more usually just a little darker. Now we can crop the images and work on background removal. We usually work in Photoshop for most of these steps. With a few actions and some black magic, we can create our final images that are just about ready for the final 360 view. We now jump over to Object2vr to create our final outputs. This step makes it possible to create multiple formats and sizes. After this step, we run a few clean-up scripts that create .GIF and .MP4 file formats as well.
So, this just about wraps up the day in the life of a product going through the process of being digitized and turned into a 360 spinning product display. I will be filling in some of the holes in the process with additional posts to touch on parts of the process that I have not covered completely. But I hope that this has given you enough information to understand the process and now you should be able to ask more of the correct questions. One last thing to keep in mind is that all of the options available in your 360 view change the 360 product photography pricing!


